This is part one of a three-part (possibly four) blog post reviewing Synology DS1621xs+ NAS Device, it is multiple parts because quite simply the useful features Synology pack into this little powerhouse device cant be covered in just one post (or if it could, it would be very lengthy). It is not to serve as nor is it a post that provides performance metrics or an instructional post that guides you through setting up the device and how-tos. There are plenty of quality articles and videos out there that do that.

Introduction
Having worked in the storage field a long time, I have become somewhat familiar with I need in a backup device – stability, reliability, availability and of course performance. I have been running the Lenovo EMC px4-300d for probably seven years now, (and still yet to have any type of failure). That had a range of features which were useful but nothing that really amazed me. Sure the unit was solid and could inject it with a range of different drives balancing speed and capacity but it really is the software around any storage system that makes me take an interest and back then, there was not a huge amount of integration packages you could expand the unit’s capability.
Fast forward to this year and Synology was kind enough to send me one of their DS1621xs+ along with Synology M.2 NVMe SSDs to test out. While the hardware they pump into this little device (form factor dimensions here) is really impressive, once again it is the software that really brings the hardware specs to life allowing multiple use cases of which I will cover some throughout this multi-part post.
I’ll carve out the sections into these use case scenarios, and provide overall thoughts on what are the best parts, and where I can see for improvement opportunities for the DS1621xs+.
Installation and setup

Getting the device up and running was simple – Three cables to be exact – Power, and two ethernet ports for network access. I decided to have a dedicated point to point connection running to my work laptop as the main use I would be utilising is the time machine backup capability which I will cover in a later section. The other data connection connects into my home network where it has a range of devices supporting my smart home, media server capabilities and of course access to the internet.
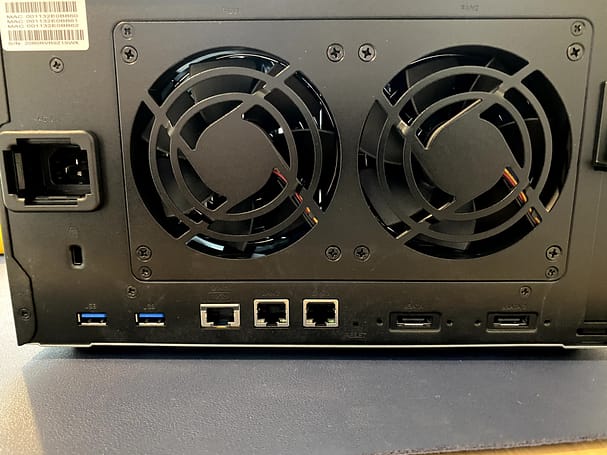
Looking at the back of the device, you can see there is a variety of connection types, 1Gbe x 2, 10Gbe x 1 and eSATA x 2, plus a couple of USB-A 3.2 Gen 1ports in case you wanted to mount an external HDD and ingest the data from it to the device. Pretty handy, as it means you can take all of those backup USB drives you have been collecting over the years, and centralise all the data stored on them into one repository.
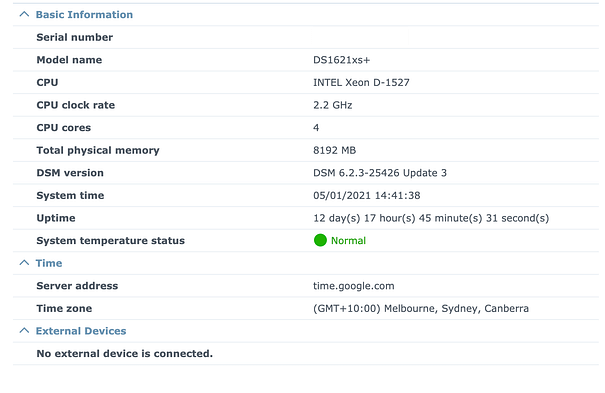
Internally, this is a little powerhouse, 8GB Memory to drove the multiple use cases, .I cant tell but this seems to be a single CPU device, meaning if the CPU dies then the NAS device stops working. Not a biggie, but most CPUS are inexpensive these days, and given the overall use casesservices this device can provide I would hope that a dual CPU option would be available to handle not just the workloads but also the SPOF. Other than that, the 4 core CPU means it is sufficient enough to handle a fair amount of workloads. I’m not aiming to stress test this thing, as this post is not focused on performance testing but I am comfortable enough that for my use case that this CPU has enough grunt to manage.
Another SPOF I did take note of is the single power input, so if you want high availability then invest in a smart UPS. In addition to this, it can house Dual M.2 2280 slots for NVMe Cache which Synology was kind enough to supply also, installation of these was relatively straight forward once you get the casing off.
Storage Hardware
Before I dive into the configuration and setup I couldn’t publish this post without touching on the awesome virtualization capabilities of this device, with full support for most virtualization solutions to enhance work efficiency with an easy management interface. VMware vSphere 6 and VAAI integration helps offload storage operations and optimises efficiency. This means when using block storage via ISCSI from the device, that you will see large operational write gains to help complete backup, snapshot and cloning tasks etc.
Configuration and Set-up
The Configuration of this device was super easy, once you power it on, you can then perform an initial discovery to detect (if using DHCP) which IP address has been assigned to it. And then you can browse to the web-assistants to get DiskStation Manager (or DSM) installed as this is the central management pane to do everything on the device, the installation took about 2 mins (even though it says 10 mins) – (reminds me of the old Windows file copy estimator).


Once the NVME was installed you can use DSM to quickly create your storage pool, assigning both the hard-drives and NVME drives to be utilised, I purchased a pair of Western Digital WD102KFBX Red PRO NAS 10TB 3.5″ SATA 6Gb/s 7200RPM 256MB Cache HDDs which I found to be on the list of supported drive list for the Synology NAS. Configured in a RAID 1 group. Whilst this cut my useable storage space in half, it does provide a very high level of protection in case one of the drives fails (more on that later)
By now I had set up the NAS device for basic use, it was ready to start writing data to it, I had a number of personal photos, backups etc I was keen to transfer across which were being stored on my LenovoEMC NAS unit (which was still chugging along after many years!)
So overall I was pleasantly surprised at how easy it was to get up and running, once the discovery had been finished – it was a straightforward process of just a few steps. Very intuitive.
Import from another Device into the Storage Pool
This is simply an excellent feature, this allows you to mount a remote folder (eg NFS, NFS4) and copy the data from that source to a volume on your Synology device and not putting the copy task on your own laptop for example. With a dedicated ethernet port, patched into my home network via 1Gbps – I was able to ingest a few terabytes of data from my other NAS device straight into a newly created volume across the two drives I had installed. I’ll cover that a bit more in-depth in the next post.
Stay tuned!